For my example, my domains are…
Local domain: vcp.local
Outside domain: vcpdomain.com.au
#NETBIOS name of Client Access exchange server: vcpsydex01
#Internal FQDN (AD name): vcpsydex01.vcp.local
#External FQDN (Public name): smtp.vcdomain.com.au
#Autodiscover name: autodiscover.vcdomain.com.au
#SubjectName: cn=smtp.vcdomain.com.au
Run the following command on the Client Access Server for generating the new Self-Signed SSL cert using the names listed above:
New-ExchangeCertificate -FriendlyName "SelfSigned Cert" -SubjectName "cn=smtp.vcdomain.com.au" -DomainName vcpsydex01,vcpsydex01.vcp.local,smtp.vcdomain.com.au,autodiscover.vcdomain.com.au -PrivateKeyExportable $True
Prior to Windows Vista SP1, the Windows RPC/HTTP client-side component required that the Subject Name (aka Common Name) on the certificate match the "Certificate Principal Name" configured for the Outlook Anywhere connection in the Outlook profile. Therefore, as a best practice, you should ensure that smtp.vcdomain.com.au is listed as the Subject Name in your certificate unless you plan on changing the configuration which can be achieved by using the Set-OutlookProvider cmdlet with the -EXPR parameter as described in http://msexchangeteam.com/archive/2008/09/29/449921.aspx.
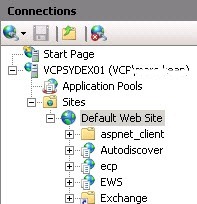
Open IIS on the Exchange Server and tell it to use this certificate.
- Click on the Default Web Site
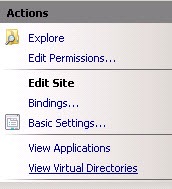
- Click Bindings on the right
- Select HTTPS, and choose edit
- Under SSL certificate, click the drop down list and choose your certificate that you created earlier.
- You need to setup the following external DNS entries 1. smtp.vcdomain.com.au 2. autodiscover.vcdomain.com.au, these need to point to the external IP address of your Exchange CAS server.
The next few steps are to install the certificate to the Clients.
- From Internet Explorer, navigate to the website of your OWA, https://mail.vcdomain.com/owa Click on Certificate Error, then click View certificates.
- Click Install Certificate
- Click Next
- Select the second option
- Select the box Show Physical Stores, Under Trusted Root Certification Authorities, select Registry and click OK
Please note, you will need to repeat this step again and choose Local Computer.
- Click Finish
- Select Yes. Close and re-open Internet Explorer.
- Close and restart Internet Explorer.
For more information, please refer to http://msexchangeteam.com/archive/2007/07/02/445698.aspx


Almost all of these steps are unnecessary. You should stay in Powershell after you import the certificate and simply use the enable-exchangecertificate command.
Agreed. You need to handle SSL certs for Exchange via Exchange – that is, the Exchange Management Shell or Console. There are a lot of virtual directories and other protocols (POP3, IMAP4, Opportunistic TLS for SMTP, etc.) that IIS knows nothing about. I’ve seen this approach cause problems down the road.
Thanks for this. Everyone else’s guides make it imposibly complicated without a technical knowledge of Exchange but your guide was a dream to use after I screwed up the initial certificate. Much apreciated. Alex.
[…] https://marckean.wordpress.com/2009/10/09/install-self-signed-exchange-2010-ssl-certificate/ […]