This post continues on from my other blog post Fully automate the removal of any Office version in preparation for Office 365. Once all Office software versions have been removed from the computer, you’ll then need to automate the installation of Office 365 on the back end of the un-installation of all legacy Office versions. This guide will demonstrate how to automatically install Office 365 using Group Policy.
First, you’ll need to download and install the Office Deployment Tool for Click-to-Run. Install this on a dedicated (file) server which will host the share and will hold a local copy of the Office 365 setup files. Beware, the Office 365 source files are around 1GB in size. If you have several sites separated by slow WAN links, you would want to dedicate a server for each site that will hold the source files, so repeat these steps for each site server. Once you have installed the Office Deployment Tool for Click-to-Run, this program will give you two files setup.exe and configuration.xml. This is all you need to 1st: download the Office 365 source files from the internet to a local repository and 2nd: Install Office 365 silently.
Download the Office 365 source files
To download the source files to your local server, first create a share and grant the everyone group read permission to the share. In my example, the share is called OfficeSource.
Edit the configuration.xml file, change the UNC path to suit your configuration.
<Configuration>

  <Add SourcePath="\\<server>\OfficeSource\" OfficeClientEdition="32" >
    <Product ID="O365ProPlusRetail">
      <Language ID="en-us" />
    </Product>
  </Add>

  <!--  <Updates Enabled="TRUE" UpdatePath="\\Server\Share\Office\" /> -->

  <!--  <Display Level="None" AcceptEULA="TRUE" />  -->

  <!--  <Logging Name="OfficeSetup.txt" Path="%temp%" />  -->

  <!--  <Property Name="AUTOACTIVATE" Value="1" />  -->

</Configuration>
Then run the the following command:
setup.exe /download configuration.xml
Install Office 365 silently
To install Office 365 silently, it’s as easy as running a similar command:
setup.exe /configure configuration.xml
Group Policy Integration
- You will need to create a service account to be used for the automated install process. The account I used was a member of the Domain Admins group in Active Directory so that the account would have local admin access on all domain joined member machines by default. I called this account svc.admin_install
- Create a user based group policy and map it to the AD Site which contains your users. Reason why I say attach to a site, so that you can create different server shares which are local to each site and specify them differently for each site based GPO. Create a scheduled task, I called this Install Office. Change the account that is used for the running of the task to the account you setup before and enter in the password when it prompts.

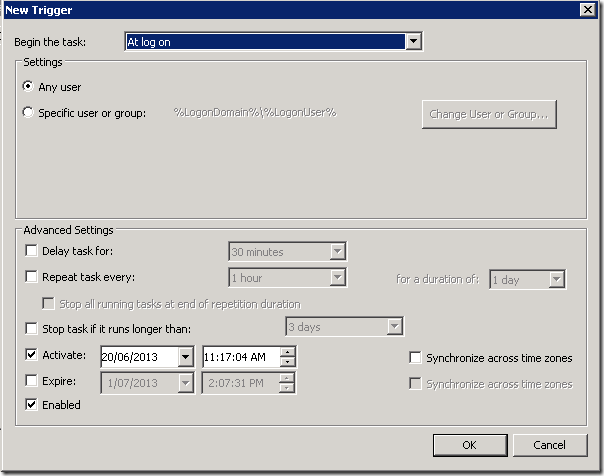
- Set the trigger to run at user logon

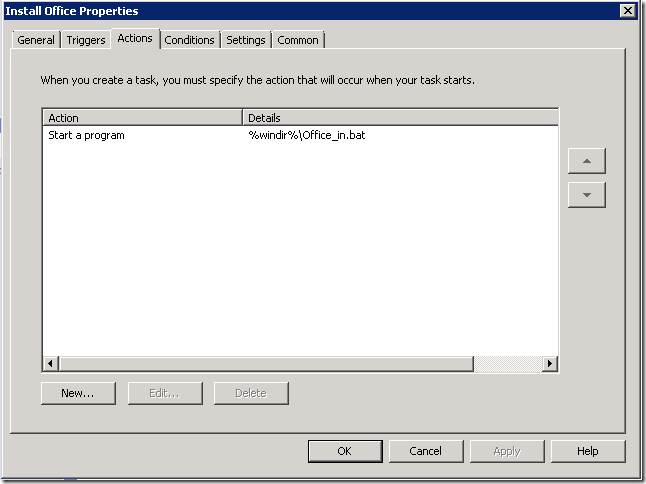
- For the action, add in “%windir%\Office_in.bat”

- There is a batch file script that needs to be distributed to the computers. Using the same group policy object, configure Files under Group Policy preferences.

The destination for this file would be %windir%\Office_in.bat
The source of this batch file can be located in any location, however as we are using a GPO, I would recommend using the logon script folder as follows:
\\domain.local\sysvol\domain.local\Policies\{3C683713-8255-4B11-955F-602B49E03A43}\User\Scripts\LogonThis batch has the following contents.
@echo off

cd %SystemDrive%\users
dir /s O551c3_1n.txt
if errorlevel 1 goto end

dir /s C0mp1et3_0ff1c3.txt
if not errorlevel 1 goto end

\\<server>\OfficeSource\Setup.exe /configure \\<server>\OfficeSource\configuration.xml

echo Office 365 Install Complete > %SystemDrive%\users\C0mp1et3_0ff1c3.txt

:end
exit
Flag Files
C0mp1et3_0ff1c3.txt – This file indicates that the Office 365 install process has completed. This file is located %SystemDrive%\users
O551c3_1n.txt – This file indicates that all legacy versions of Office have been removed and is created upon completion of the uninstall script in my other post. This file is located %SystemDrive%\users
As this post continues on from my other post to uninstall Office. When this install script is executed, it checks for O551c3_1n.txt, only if this file is found, the script continues. This script then looks for C0mp1et3_0ff1c3.txt, if this file doesn’t exist, the script continues.

[…] Office 365 automatically and silently using Group Policy and source files from a local repository. My other blog post discusses a solution that worked for us, to install Office 365 in a corporate environment and fits […]
[…] removes Office 2010 and the 2013 Lync Client. Thankfully there was a good post by Marc Kean about Fully Automate the removal of any Office version in preparation for Office 365. In his post it gives you the batch script command need with a couple of […]
How does this process handle existing outlook configurations? Will the users need to reenter their o365 credentials when running outlook, etc. for the first time since the first step completely wipes the previous versions of office? Is there any way to automate things so that office 2010 is removed cleanly to avoid user confusion, but not require users to reauthenticate? The users at one of our clients are particularly tech-illiterate and asking them to reauthenticate is going to result in a large number of password reset requests.
Yes, here is a link to fully automate the removal of any previous version of Office https://marckean.wordpress.com/2013/06/18/fully-automate-removal-of-any-version-office-in-preparation-for-office-365/
Based on my experience doing many computers like I have described on my blog, the first step removes any previous version of Office (2003, 2007 or 2010), then reboots the computer, then installs the new click-to-run Office 365 fully. The first time the user opens Outlook the OST file is upgraded, but then everything else stays the same, e.g. all Outlook settings: Signature, Quick Parts, history of email addresses, flagged emails, coloured categories, auto-correct, conversation view and Outlook rules. Most of this Outlook information is stored in the local Windows user profile – as this doesn’t change, these settings remain. Other settings are stored within the Exchange mailbox, so depending on your version of Exchange it might be different. But we were using Exchange 2010 SP3 and all Outlook settings remained as is with my removal and re-installation procedure based on my experience doing about 100 machines all running Windows 7.
Does this answer your question?
Marc, I just ran through the automated installation steps, however when I run the command: setup.exe /configure configuration.xml office does not install. I’ve tested from multiple machines.
I’ve read your instructions and have seen them echoed in a number of places but I can’t get off first base with it. Right after running the install, I get a message that either I have no Internet or I’m low on disk space, neither of which are the case. Any suggestions?
Jeff, probably you already found a solution, anyway, I went through the same problem and it was related to the path specified in the configuration.xml file. The path has not to contain the folder “Office” that is created automatically when you use the setup.exe in download mode. When I downloaded the installation files in the network folder \\servername\SoftwareDistribution\Office_365_Click-to-Run\x64, it created a folder named “Office” containing a subfolder named Data and so on; then I entered exactly the same path in the configuration.xml file before using the setup.exe in configure mode. After that, everything went fine.
Andrea, I am trying to get this to work and I can’t figure out why I keep getting the same error. My current sourcepath is set for <Add SourcePath="\\server\OfficeSource\Office\" OfficeClientEdition="32". Should I include the Data folder in the sourcepath?
What would I have to do to use this process to install Office 365 Enterprise E3?